Tag: technique

  • Where to Place a Horizon in Your Paddling Pictures?

    Where to Place a Horizon in Your Paddling Pictures?

    I am revising another old blog post on photography composition. It was originally published in October, 2007.


    The horizon line is perhaps the most important composition element in paddling pictures, especially, in those shot from a kayak in open water. You can achieve quite different effects depending on the horizon placement within your picture frame.

    During my recent evening paddling on the Beaver Pond in Arapaho Bend Natural Area near Fort Collins, Colorado, I had a great light, an interesting, fast changing sky, and nice fall colors. I shot many pictures with my Pentax Optio W10 camera trying different compositions of the same scene. Shooting from the tippy Thunderbolt kayak was quite challenging, but fun.

    Here are 7 examples from my photo paddling session with comments on the composition and the horizon placement. I am posting pictures in the vertical format to avoid the “horizontal or vertical” question.

    1.

    Let’s stop in the middle of my lake and shoot some pictures.

    The first shot is a “classic” composition with the horizon around the lower 1/3 of the picture following the Rule of Thirds. The emphasis is on the sky, but the water with reflections and ripples also has a strong impact.

    Well, this sky is not that dramatic after all. What about more water here.

    paddling in Colorado

    2.

    My kayak was slowly gliding forward, but the next picture was taken from the almost the same position.

    This time the horizon was placed high in the frame (even above 2/3). The emphasis is on the water with reflections. I like how the water ripples look at this shooting angle. Notice the difference in comparison to the previous shot.

    What is missing in this picture? Something small in the foreground. A bigger water ripple? A floating gold leaf? That would be ideal. I found that leaf later.

    paddling in Colorado

    3.

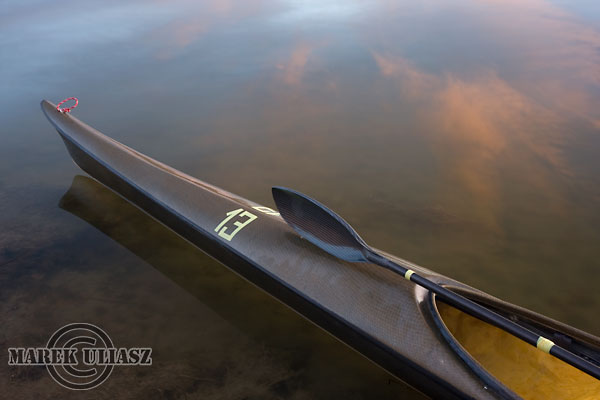
    Let’s add a kayak to the scene. The horizon went even more up to show the bow of my Thunderbolt. The water ripples do not look so nice from this shooting angle.

    I prefer these kind of shots to be perfectly symmetrical or with the kayak placed more along diagonal. My favorite “kayak bow” picture is shot from the water level on a kayak side like that one from the Boyd Lake. Actually, my original composition here was symmetrical, but the horizon was tilted and I needed to slightly rotate the picture.

    A bow wake would be nice in my shot here. The kayak looks somehow disconnected from the water. I believe that the light was still too harsh to show the kayak deck. The picture is OK, but not great.

    So, let’s keep paddling …

    paddling in Colorado

    4.

    One more lap around the lake.

    The clouds and sky are changing all time.

    Another shot with the horizon low in the picture frame. There was nothing very exciting in the water, but the sky was worth to capture. A nice paddling picture.

    paddling in Colorado

    5.

    Let’s go closer to the shore, so we can see some reflections of cottonwood trees in the kayak deck. Perhaps, it is too much of the kayak included in my frame here, but I really wanted to cover those reflections.

    Should I remove the number “13” from my kayak deck? I put it there before the Kansas River “Fitty Gritty” race in June. It is just a yellow electric tape, but, maybe, it adds some character to my kayak?

    paddling in Colorado

    6.

    What about breaking the Rule of Thirds and place the horizon exactly in the middle of the frame? This usually results in a more static and calm composition. The photo tips for beginners usually warn you not to do it.

    Well, I just like shooting those static, symmetrical pictures, but rather in a horizontal format. However, I needed the vertical format here to show both clouds and their reflections in the lake.
    I believe that the kayak bow adds some dynamics to the scene.

    It would be interesting to shoot the same scene at higher kayak speed with more of a bow wake. I would rather mount the camera on the kayak deck for this purpose and shoot in the interval mode. I have not tried the vertical format with the deck mounted camera yet.

    paddling in Colorado

    7.

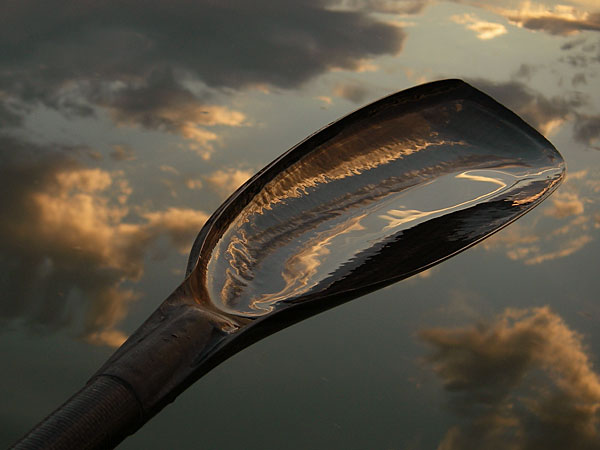
    Sometimes, we just don’t need the horizon in the picture frame at all. The water provides enough interest.

    But, that was another paddling evening with another kayak – Sisson Nucleus. It is interesting that the white hull of Sisson and the black hull of Thunderbolt kayak look the same after sunset. They both work as a reflective mirror.

    Please let me know if you find this type of blog posts useful. I can certainly write more comments about my paddling pictures.

    And, please provide comments for specific pictures discussed here, especially, if your interpretation or suggestions for improvements differs from mine.

    Related posts and links:

  • 7 Tips for Photographing Paddlers

    7 Tips for Photographing Paddlers

    I would like to remind you this old post, How Did you Shoot It? with some updates and revisions. It was written two years ago as part of ProBlogger’s group writing project – “How to …” I hope that these tips are still useful. They represent quite well my own approach to paddling photography.


    After posting the above picture, “Paddling in Clouds”, I’ve got several questions: How did you do it? And, I had troubles to provide a reasonable answer since the shot was technically really trivial.

    Finally, I figured out that it is more about seeing pictures than about shooting and wrote these more general comments.

    1. Look and See

    Learn to see pictures. You do not need a camera to practice it. I am often “shooting” without camera, especially, when driving: that would be a good picture, this old barn would look great at sunrise, that dust devil at a horizon can be seen only through polarized glasses.

    I believe that looking at photographs in magazines, books and calendars also help to develop your seeing capability. I am checking all new photography books arriving to my university library and browsing most of photography magazines in a local bookstore.

    There are several good books on the art of seeing. Freeman Patterson comes to my mind first. Recently, I spent a lot of time with Photographer Eye by Michael Freeman.

    2. Have a Camera

    A photographer is shooting pictures, not a camera, but you should have your camera ready. “Ready” means not only accessible. You should be familiar with your camera settings and operations. Learn what camera settings are working for your paddling photography. It may be difficult to figure out camera features when sitting in a tippy kayak and waves are splashing.

    Compact waterproof digital cameras like Pentax Optio “W” or Olympus Stylus “SW” revolutionized my kayak photography. I can shoot pictures I was not able to execute before, e.g., with a partially submerged camera. I am ready to sacrifice some camera features or to some extend a picture quality for convenience and accessibility of these tiny camera for paddling environment.

    3. Be Aware of Light

    The best light for outdoor photography is when the sun is low, i.e., around sunrise and sunset. I know that I can expect interesting light at the end of my afternoon paddling workout. If the sunset is not very exciting I can shoot water reflections or a tree silhouette.

    Ironically, on paddling trips, we are often passing the best scenery in the middle of day, when the light is harsh and unpleasant. I am still shooting some snapshots for documentary purposes. My primary motivation to start paddling fast kayaks was to get in time to my shooting spots. All that racing craziness came later …

    4. Point (compose) and Shoot

    Do not be afraid to shoot without viewfinder. Well, you don’t have one in Pentax Optio. And, the LCD display is often difficult to read in a bright sun. It shouldn’t stop you from shooting. Use some creative angles as far as you can extend your arm. Remember, you can put this camera under water next to you kayak. The lack of a viewfinder is perhaps the main reason preventing some photographers from buying this camera, but I think that this a reasonable compromise in the camera of this size.

    I didn’t have a clear view of the camera display when shooting my “Paddling in Clouds” picture. I was just trying to keep a paddle diagonally in my frame.

    foggy sunrise over Suwannee River, Florida

    5. Shoot Multiple Frames

    Shooting pictures with a digital camera is cheap. You do not need to worry about film cost. You can always erase the picture and shoot again unless you are after some action shots. So, do not be afraid to experiment and shoot even if you do not see the image in your LCD monitor. Shoot some extra frames. It is helpful to have an adequate memory card.

    I shot about 30 frames trying to catch a sky reflection in water and in my paddle. However, I would show not more than 3 or 4 from those 30 frames.

    6. Practice

    The more you shoot the better you should get. I have shot similar pictures before including reflections and a paddle.

    Review your pictures on the camera LCD if possible. Check the histogram. Analyze your shots after paddling on a computer screen. You have all information about camera setting included in each digital image file. Try to figure out what worked and what not. Learn from mistakes.

    7. Have Fun

    I don’t consider myself a professional photographer. When paddling I am shooting what I like just for fun. Documenting my paddling trips and races is still fun. I feel free to experiment.

    The great Alfred Stieglitz was an amateur photographer too. Anyway, the photography is not a profession

    Sometimes I sell a picture to a magazine or donate to a book cover. A year ago, I started to sell my pictures through microstock agencies. I am just taking more often my DSLR camera and a tripod for paddling.

  • 10 Tips How to Avoid Blurry Pictures when Shooting from a Kayak

    Compact waterproof digital cameras like Pentax (Ricoh) Optio WG-series or Olympus Tough series are popular among paddlers. They may not offer the highest image quality among point-and-shoot cameras, but they still produce decent pictures. Most importantly, you can photograph in conditions where other cameras are better kept in a dry case or box.

    However, new camera owners are often getting pretty bad, blurry pictures and are really disappointed with a purchase. Shooting on water from a kayak or canoe requires some extra efforts and practice from a paddling photographer. Here are a few tips which may help. This is an update of my old post written 5 years ago. Cameras are getting better, but, I believe, the tips below are still valid. I have been using Pentax Optio waterproof cameras starting from the original model WP, then W10, W30, and, currently, WG2 is attached to my life jacket.

    1. Use the automatic mode

    I do not have any special settings for my camera. On water I use exclusively the P (program) mode. Of course, in addition to the P mode I use the movie mode and interval drive mode quite often.

    You can program the green button to do useful adjustments without a need to go through a setup menu. I am using two functions assigned to the green button: exposure correction and, much less often, white balance setups. Typically, I underexpose my shots to avoid overexposed areas with wash out details. Coincidentally, it shortens the exposure time which helps to avoid blurry pictures, but this is not a main purpose of this adjustment.

    2. Keep the camera steady

    This is the most important tip. However, it is not so easy when paddling, especially, when water is not calm. Ideally, you should hold the camera in both hands. In addition, it is quite easy to shake the light and small camera just by pressing a shutter button.

    3. Use a paddle shaft to stabilize the camera

    Here is a short video clip demonstrating how I am doing it.

    This technique really helped me when I was starting to paddle a tippy Sisson Nucleus kayak. You can achieve two goals: to stabilize the camera and to stabilize your kayak. You have your paddle ready for bracing. This technique does not work with strong, gusty winds.

    You can go further with this idea and attach or mount your the camera more permanently to your paddle – see a camera cradle by Mark Sanders.

    4. Use a self timer

    The 2 second selftimer available in Pentax Optio is very useful to avoid shaking the camera when pressing the shutter button. I recommend it, especially, when you are holding the camera with one hand (shooting on an extended arm or from some unusual angles).

    5. Keep your lens clean of condensation, water drops, water residue

    I keep my camera in a small neoprene pouch attached to my life jacket and usually do not have problems with water or dirt on my lens. The camera is always on a tether. Shooting with a camera mounted on a deck and exposed to splashes is another story.

    6. Pay attention to light and sun position

    Try to shade you camera lens from a direct sunlight to avoid a lens flare. Do not shoot against the sun.

    It is possible, at least for Pentax, to glue (epoxy) some step-up rings and to attach lens hood to your camera. I am using much simpler solution: an improvised lens hood attached with an electric tape to the camera.

    You can expect the best “sweet” light for shooting when the sun is low, so after the sunrise and before sunset. Do not expect too much from this camera in low light conditions, but do not give up with shooting as soon as the sun is down. Consider shooting some silhouettes or water reflections then.

    7. Use flash

    Sometimes, I use flash to add light to objects in my fore plan. Usually, a soft flash option works better for a kayak deck. Be aware of any reflective tape on your kayak or gear.

    8. Shoot multiple frames

    Don’t limit yourself to a single shot for a given scene. Repeat the shot. Try different angles, horizontal and vertical format. You will increase your chances to get that great shot. Digital memory is cheap. You can always erase unsuccessful pictures later.

    9. Photoshop …

    Downloading pictures from the camera to your computer is not the end of your work as a photographer.
    Use Photoshop or other image editing software to post process your pictures. Most often, I rotate my pictures to make horizon horizontal, adjust the exposure with levels, crop and resize them, and, finally, apply some sharpening. You cannot save completely blurred pictures in Photoshop, but you can improve most of them.

    10. Practise

    There are no reasons not to take and use the camera wherever you go. It is small and waterproof. Experiment and have fun.

    Time to to time it is useful to browse through the camera manual. You may find something new and exciting in a jungle of all these options and settings.

    More tips?

    Could you share tips from your experience with a kayak or canoe photography? Are your on water pictures worse than these shot on land?

  • Shooting Paddlers – Photographic Adventures with Canoeists, Kayakers and Rafters

    Shooting Paddlers – Photographic Adventures with Canoeists, Kayakers and Rafters

    Shooting Paddlers: Photographic Adventures with Canoeists, Kayakers and Rafters

    Shooting Paddlers: Photographic Adventures with Canoeists, Kayakers and Rafters, book by Toni Harting, a Canadian outdoor photographer, writer and canoeist. 212 pages. Cardinal Publisher’s Group, 2004.

    Toni Harting migrated to Canada from the Netherlands in 1970 and has lived in Toronto with his wife and canoeing partner, Ria, ever since. He holds two Master of Applied Science degrees in aerospace engineering, but left his consulting engineering profession in 1974 to build a new career as full time freelance photographer specializing in canoe topics, particularly wilderness canoeing.

    You can learn a lot from his book. It is designed to help all paddlers strengthen their ability to see, recognize and record meaningful images. At the same time the book is simply fun to read or browse through it.

    There are more than two hundred black and white and color pictures. Some of them are in two versions, e.g. an original picture and the same picture after cropping. Each picture is accompanied by its story and discussion with tips on composition, technique and logistics. Of course, there is also a chapter on equipment but you will not find information on a highly specialized gear, rather tips on using regular 35 mm point-and-shoot and SRL cameras.

    There are many amazing shots. You can see a lot of action pictures from canoe and kayak racing and rafting, contemplative scenic or close up shots, pictures from paddler’s life on camping or portage trail. You will not find many pictures from sea kayaking, but a great representation of a canoe including sprint and marathon canoes, voyageur canoes and dragon boats.

    My picture of a paddle in my another weblog entry was inspired by one of Toni Harting photos. I just need to work more on that shot… And, I got some more photo ideas from his book.

    I always admire people who have sacrificed their “other” career to be a full time photographer. I know enough about photography to recognize how hard photographer job is and that it is not only about shooting pictures. Writing skills help for sure.

    Outdoor and action adventure photography books:

    />

    Related posts and links: